PS1 BIOS SCPH1001.bin (PSX)

| Console | Bios > Emulators > Playstation (PSX) Emulators |
|---|---|
| Publish | 11 Dec 2025 |
| Region | USA/EU/Japan/World |
| Size | 236 KB |
| Format | .bin |
| Downloads | 17037 |
Running a classic PlayStation game through an emulator is supposed to be simple. You pick a title, press run, see the familiar logo and a few seconds later you are in the main menu. When the BIOS file is missing or not configured properly, that simple flow breaks. Some emulators sit on a black screen, some crash right after the intro, and sometimes memory card saves become unusable even though the game image is perfectly fine.
In many setups, the missing piece is a proper PS1 BIOS file. Once the correct BIOS is placed in the right folder and selected in the emulator, behaviour becomes much closer to a real console. This guide focuses on the most widely used PlayStation BIOS, SCPH1001.bin. It explains what the file does, which other BIOS versions exist, how to configure them in popular emulators, and how to solve the most common problems players run into.
PS1 BIOS SCPH1001.bin file details
Most discussions about a PS1 BIOS download are actually about one specific file. The essentials look like this:
- File name: SCPH1001.bin
- System: Sony PlayStation (PS1 / PSX)
- Region: USA, NTSC-U
- File type: BIN image, usually stored inside a ZIP or 7z archive
- Approximate size: under one megabyte
- Works with: ePSXe, DuckStation, RetroArch with the Beetle PSX core, PCSX-Reloaded and most mature PS1 emulators
- Platforms used on: Windows, Linux, macOS and Android
The filename matters more than many people expect. A lot of front-ends and emulators try to auto-detect BIOS files by searching for names such as scph1001.bin. If the file is renamed to something completely different, automatic detection can fail even though the file itself is valid.
Role of the PS1 BIOS inside the console and the emulator
Every original PlayStation has a small piece of firmware that runs before any game starts. This firmware is the BIOS, short for Basic Input / Output System. When the power button on the console is pressed, the BIOS performs a series of jobs in a very short time.
- It checks which controllers and memory cards are connected.
- It prepares the main parts of the video and audio hardware.
- It shows the classic PlayStation boot animation.
- Finally it hands control over to the disc or image that contains the game.
On a real console this all happens so quickly that most players barely think about it. Inside an emulator things work differently. If that start-up behaviour is not reproduced accurately, the program has to guess how the original console behaved. Many emulators therefore include a high level emulation BIOS substitute. That option works for a portion of titles, but it can break badly in games that rely strongly on original timing or specific quirks of the real machine.
Using an authentic PlayStation BIOS has several very practical effects.
- Games that used to freeze on the first logo now reach the title screen.
- Full motion videos and cutscenes keep audio and picture in step.
- Memory card screens look correct and game saves stay visible between sessions.
- Region specific issues are reduced when game region and BIOS region match.
For long role-playing games, platformers with many checkpoints and anything with heavy use of video, a reliable BIOS often makes the difference between a weekend of testing and a weekend of normal play.
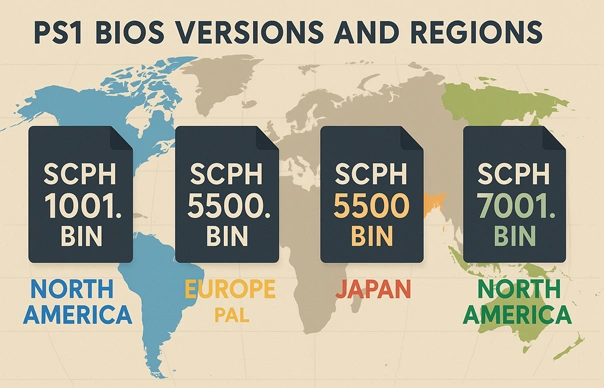
PS1 BIOS versions and regions
SCPH1001.bin is only one revision of the PlayStation BIOS. Sony produced several versions for different parts of the world and for later console models. Emulators recognise many of these files and treat them as valid BIOS choices. Some of them are better suited to certain setups than others.
These filenames appear frequently in PS1 emulation guides and packs:
- SCPH1001.bin – North America, NTSC-U, by far the most common choice and a stable option for general use
- SCPH1002.bin – Europe, PAL, often used with titles released only for that region
- SCPH5500.bin – Japan, NTSC-J, a popular option for Japanese imports
- SCPH5501.bin and SCPH5502.bin – later revisions for North America and Europe
- SCPH7001.bin and SCPH7003.bin – newer console models that also work well in current emulators
Keeping BIOS and game from the same region usually gives the most predictable behaviour. Players who enjoy games from several regions often keep a compact PS1 BIOS pack inside one folder, then switch the active BIOS in the emulator when they move from a US title to a European or Japanese one.
Preparing the PS1 BIOS file
Once the BIOS archive has been downloaded from a trusted source, setup is straightforward and only needs to be done once for each emulator.
- Step one is to extract the archive with a normal tool so that the .bin file becomes visible.
- Step two is to place that .bin file in a dedicated folder for BIOS files. Many users simply call this folder bios and keep it next to the emulator folder.
- Step three is to leave the filename as it is, unless the official documentation of the emulator clearly requests a specific alternative name.
- Step four is to reuse this folder for multiple emulators when possible. A single central BIOS directory makes it easier to manage files when moving between front-ends.
Once these steps are done, you simply point each emulator to that folder and normally never have to change the setting again.
Using PS1 BIOS in DuckStation
DuckStation aims for accuracy and keeps BIOS configuration simple.
- Start DuckStation.
- Open the settings window and go to the section related to BIOS or console settings.
- In the BIOS path field, choose the folder that holds SCPH1001.bin and any other PS1 BIOS files you want to keep.
- DuckStation scans that folder and lists every BIOS file it understands. Pick the one that fits your current region, for example SCPH1001.bin for NTSC-U games.
- Apply the settings and restart the emulator.
- Load a game image. If the BIOS is configured correctly, the PlayStation boot animation appears before the game menu.
Using PS1 BIOS in RetroArch with the Beetle PSX core
RetroArch acts as a hub for many different systems. For PlayStation emulation, most people use the Beetle PSX or Beetle PSX HW core.
- Close RetroArch if it is running.
- Copy the PS1 BIOS files into the RetroArch system directory. On Windows this directory is usually inside the RetroArch folder. On Android it normally sits under the RetroArch directory in internal storage.
- Make sure the BIOS filenames match what the core expects. Beetle PSX recognises names such as SCPH1001.bin, SCPH5501.bin and several other region files.
- Launch RetroArch and select or download the Beetle PSX core.
- Load a PlayStation game. When the core finds a valid BIOS in the system directory it uses that file automatically and shows the familiar start-up animation before the game begins.
- If RetroArch still reports a missing BIOS, open Settings → Directory → System and verify that the path points to the folder that actually holds the .bin files.
Using PS1 BIOS in ePSXe
ePSXe is an older emulator but many players still rely on it on Windows and Android. The way it handles BIOS files is slightly different but not complicated.
- Launch ePSXe.
- Open the configuration menu and choose the option that relates to the PlayStation BIOS.
- Browse to the folder that contains your BIOS files.
- Highlight SCPH1001.bin or another region file that suits the game you want to run and confirm the choice.
- Save the configuration and restart ePSXe.
- Load an ISO or disc image. When ePSXe shows the PlayStation logo and then moves directly into the game, the BIOS is in active use.
Menu labels change a little between ePSXe versions, yet the logic stays the same. Point the program to the correct folder once, select the file you want, and keep that configuration for future sessions.
Solving frequent PS1 BIOS problems
Having the correct file is only part of the story. A few typical problems show up often among new users. The following checks resolve most of them.
Emulator shows only a black screen after start
This situation usually means that the file exists on disk but the emulator is looking in the wrong place. Open the configuration, set the BIOS path again, and confirm that the selected file belongs to the same region as the game in use.
Game jumps back to the BIOS menu instead of launching
In this case the problem often lies in the game image rather than the BIOS. Try the same image in another emulator or obtain a fresh dump of the game. Keep the BIOS and game regions aligned while testing.
Save files vanish or are not visible in the memory card menu
Many emulators allow virtual memory cards per slot or per game. If one of these cards becomes corrupted, delete it and create a new one, then test again with the same BIOS. Mixing several BIOS files with a single save folder can increase the chance of issues, so it helps to settle on a small set of trusted BIOS revisions.
Sound glitches or cutscenes drifting out of sync
Review video and audio settings first. If those look reasonable, try a BIOS file from the same region as the game being played. A European release combined with a North American BIOS can sometimes lead to odd timing in specific scenes.
Emulator closes as soon as the game starts
A crash right after launch often indicates a damaged BIOS file. Replace the BIOS with a verified copy of the same revision. Avoid editing the contents of the .bin file manually. Even a small error in the firmware image can crash an emulator much faster than a broken game ISO.
Safe use and reliable sources
In the long term the safest path is to use a BIOS that originates from hardware you own. Several homebrew utilities can read the firmware from a real PlayStation console and save it as a .bin file. That output can be moved to a PC, laptop or phone and used in emulators exactly like any other BIOS image.
Whichever method is used to obtain the file, it is wise to keep the contents untouched and store a backup copy somewhere outside the emulator folder. A single verified BIOS image tends to remain useful for years and across multiple devices, so keeping a spare copy saves time later.
Short notes about PS1 BIOS usage
- Some emulators can run basic tests without a real BIOS file by relying on internal substitutes, but those substitutes are not designed for full compatibility. Players who want long sessions with role-playing games or action titles usually prefer a genuine BIOS such as SCPH1001.bin.
- SCPH1001.bin is an excellent starting point for NTSC-U games, although it is not the only file worth storing. People who regularly play European and Japanese releases tend to add SCPH1002.bin, SCPH5500.bin and a handful of other revisions so that every region has at least one suitable BIOS.
- Keeping a small pack of PS1 BIOS files in a single folder makes management easier. Most emulators allow a single directory to be used as the BIOS location, then either select a file automatically or present a list in the settings menu.
- The physical location of the BIOS folder is flexible. Any directory works as long as the emulator knows where it is. Many users place a folder named bios next to their emulators and keep all PlayStation BIOS images inside that folder. That habit makes backups and migrations simpler.
Checklist for stable PS1 emulation
Before starting a long session, it helps to run through a very short checklist.
- Confirm that SCPH1001.bin or another valid BIOS file is present in the folder used by the emulator.
- Keep BIOS region and game region aligned for most cases.
- If you move files or update the emulator, open the settings once and confirm that the BIOS location still points to the folder you expect.
- Maintain a small set of BIOS files for different regions if imported games are part of your collection.
- Back up the BIOS folder and virtual memory cards so that a drive failure or accidental deletion does not erase hours of progress.
Once these basics are in good shape, PS1 emulators stop feeling fragile. Games boot when they should, long cutscenes keep audio and video together, and your saves are still there the next time you start playing. The BIOS takes care of the low-level work in the background and you can stay focused on the game itself.

Been looking all over for a working PS1 BIOS and finally found it here. No junk, no broken files. just what I needed. Downloaded and set it up in my emulator, and it worked right away.
PS1 BIOS downloaded! Unlocking a flood of memories with each pixel
Downloading the PS1 BIOS feels like opening a virtual time capsule. Not just files; this download serves as the gateway back into gaming’s golden age
It’s work on my PC very well and I Play different PS1 Games.